Preventive vs Reactive Maintenance: The True Cost Difference
FixAhead Team · January 28, 2026
Reactive maintenance costs more per repair than preventive maintenance, and the extra cost reaches past the repair bill. Start preventive maintenance with your most critical assets, once you know what you have.
What is Reactive Maintenance?
Reactive maintenance (also called run-to-failure or breakdown maintenance) means you fix equipment after it breaks. There’s no scheduled inspection or servicing. You wait for the failure, then respond.
This approach feels cheaper in the short term because you’re not spending money on maintenance until something breaks. But the hidden costs are significant.
What is Preventive Maintenance?
Preventive maintenance (PM) means you service equipment on a regular schedule — before it fails. This includes inspections, lubrication, filter changes, calibration, and component replacement at manufacturer-recommended intervals.
The goal is simple: catch problems early when they’re cheap to fix, instead of waiting for catastrophic failures that are expensive to repair.
The True Cost Comparison
Direct Costs
A reactive repair carries these direct costs:
- Emergency labor — Unplanned repairs often require overtime or emergency callouts
- Expedited parts — Rush shipping for replacement parts costs significantly more
- Collateral damage — A failing bearing can damage the shaft, housing, and seals if not caught early
- Production losses — Every hour of unplanned downtime costs production revenue
Indirect Costs
Beyond the repair bill, reactive maintenance creates hidden costs:
- Reduced equipment lifespan — Equipment that isn’t maintained wears out faster
- Safety risks — Failed equipment can injure workers and create liability
- Quality issues — Degraded equipment produces lower-quality output
- Team stress — Constant firefighting burns out your maintenance team
- Lost knowledge — Without documented procedures, repairs depend on individual expertise
How to Transition to Preventive Maintenance
You don’t need to switch overnight. Know what you have first, then start with your most critical assets.
Start With What You Have
If nobody has written down your assets, their manuals, or their service history, build those records before anything else. The steps that follow need them.
Walk the site and write down each asset with its make and model, read from the nameplate or label on the equipment. Then collect a manual for each model. Start with the manufacturer’s website. Where there isn’t one, ask the manufacturer for it, quoting the make and model.
Pull the daily, weekly, monthly, quarterly, and yearly tasks from each manual and attach them to the asset they belong to. Those tasks become the calendar: one row per asset and task, with the date it is next due. Decide which tasks your team does and which go to a vendor under contract, and write that beside each row.
Before you spend anything on the program, record how each asset runs today and what has already failed. Without that record, you can’t show later what the program changed.
Step 1: Identify Critical Assets
Which equipment would cause the most downtime if it failed? Which failures would be the most expensive? Start your PM program with these assets first.
Step 2: Establish Baselines
Check manufacturer recommendations for service intervals. Review your breakdown history, if you have one, to identify failure patterns. If a motor fails every 6 months, schedule inspection at 4 months.
Step 3: Create Schedules
Set up recurring maintenance schedules — daily, weekly, monthly, quarterly, or yearly. A CMMS creates each work order before its due date.
Step 4: Define Procedures
Create standardized checklists for each maintenance task. This ensures consistent quality regardless of which technician performs the work.
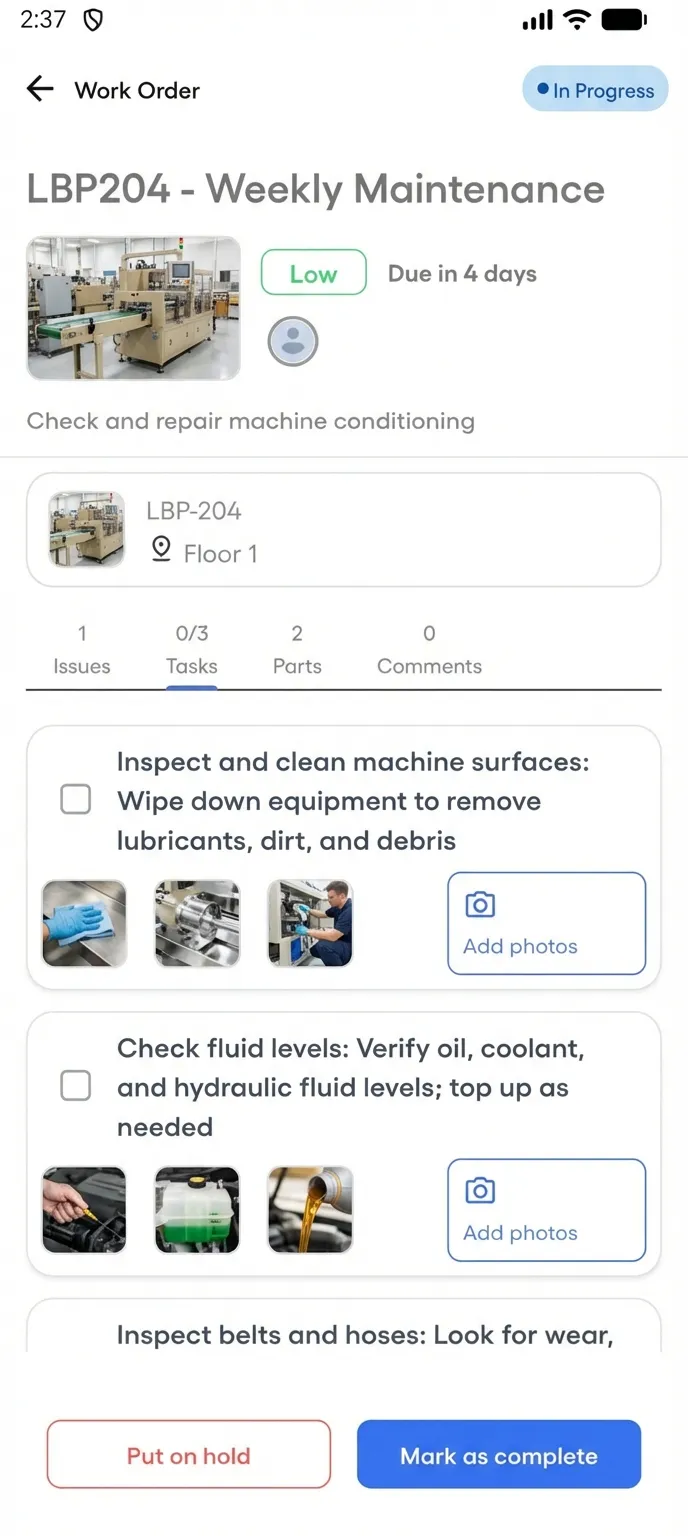
Step 5: Track Compliance
Monitor your PM compliance rate — the percentage of scheduled maintenance completed on time — and find the cause of each missed task.
Where to Keep Them
In preventive maintenance you set any frequency and a lead time, and FixAhead creates each work order ahead of its due date.
A register already in a spreadsheet comes in through bulk import, from a CSV or Excel file, with each row checked first.
Create your account, import your assets, and start scheduling preventive maintenance — all in the same afternoon.
The next step is the Free plan. It has no credit card and no time limit. Free holds the register and the calendar: asset tracking with full lifecycle and preventive maintenance scheduling, for 2 users with unlimited assets, or 50 assets with unlimited users.
Documents and file attachments, and maintenance procedures and checklists, come with Pro (pricing).
Set up preventive maintenance in FixAhead
Before you import, create the locations the file names under Organization, and the asset categories under Library. Add the assets and the procedure first; the schedule uses both.
1. Import your assets
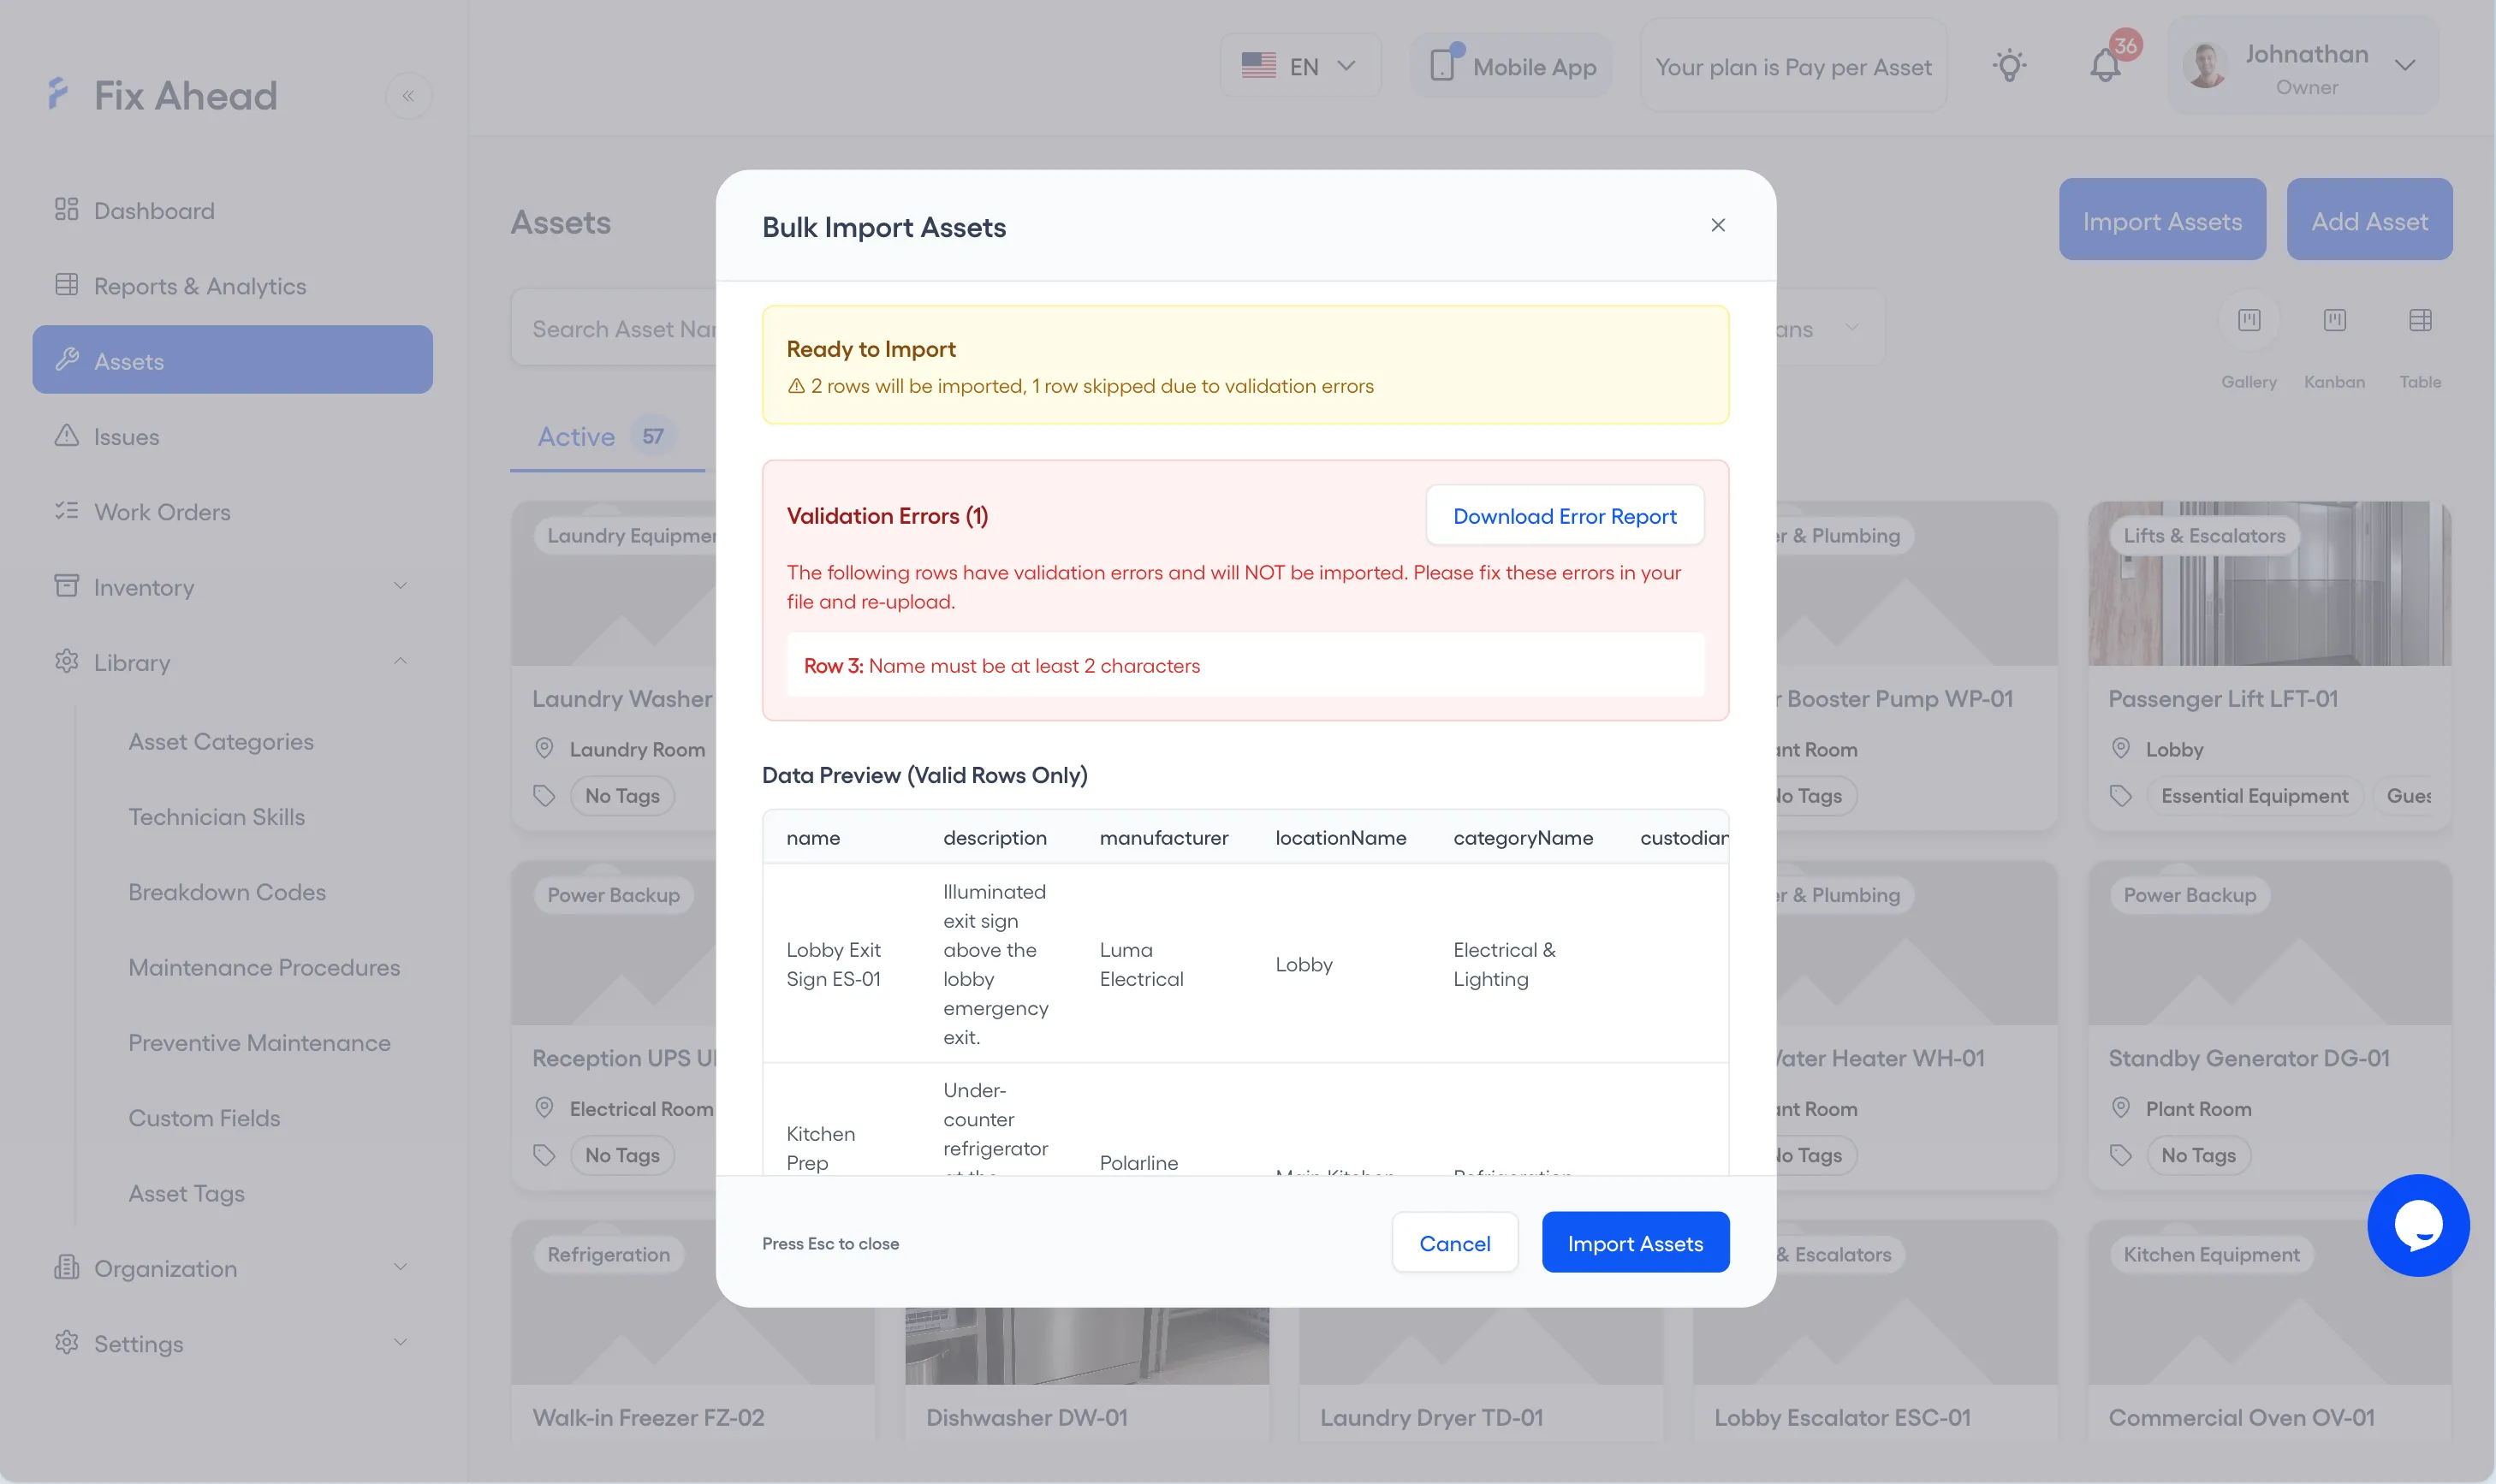
On Assets, press Import Assets, download the template, and fill in one row for each asset. Under Upload File, choose the CSV or Excel file, then read Ready to Import: rows listed under Validation Errors are skipped, and the rest come in when you press Import Assets. A location or category the file names must match an existing one exactly, or nothing is imported.
2. Add the procedure
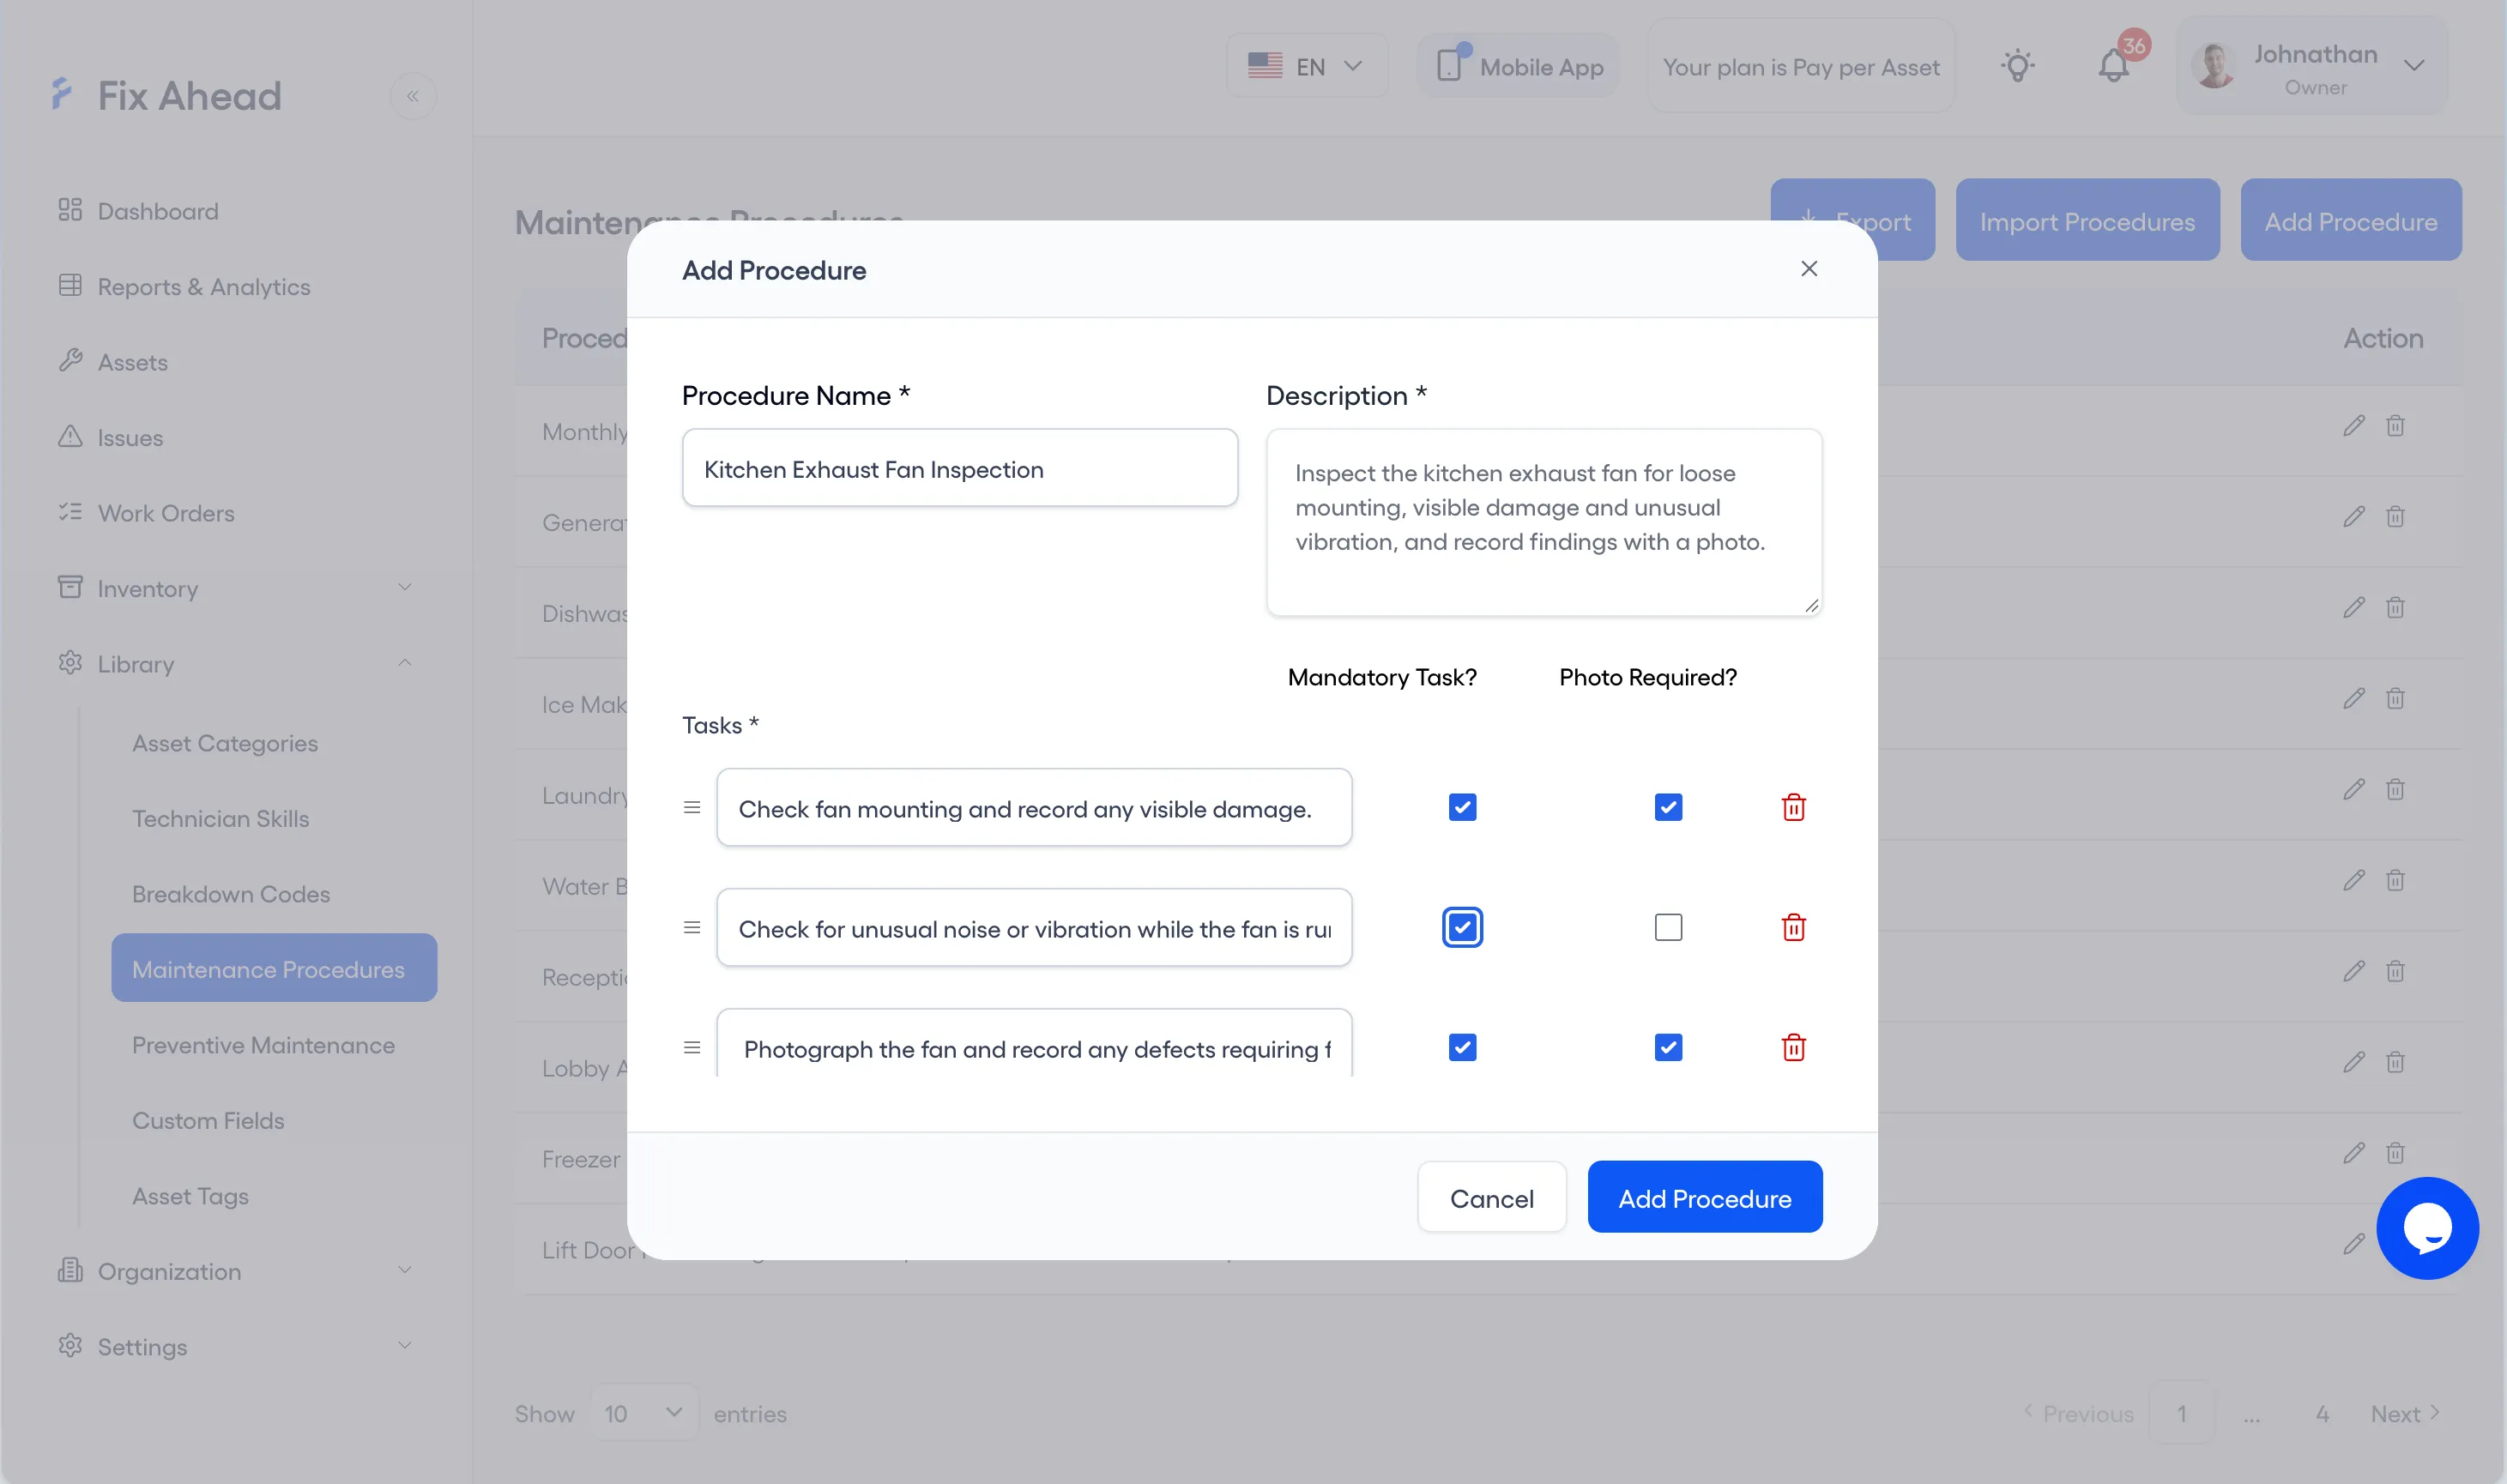
Library is open to the Owner and Managers. Under Library, open Maintenance Procedures and press Add Procedure. Name the procedure and describe it, add a row for each task, tick Mandatory Task? or Photo Required? where a task needs it, then press Add Procedure.
3. Name the task and assign it
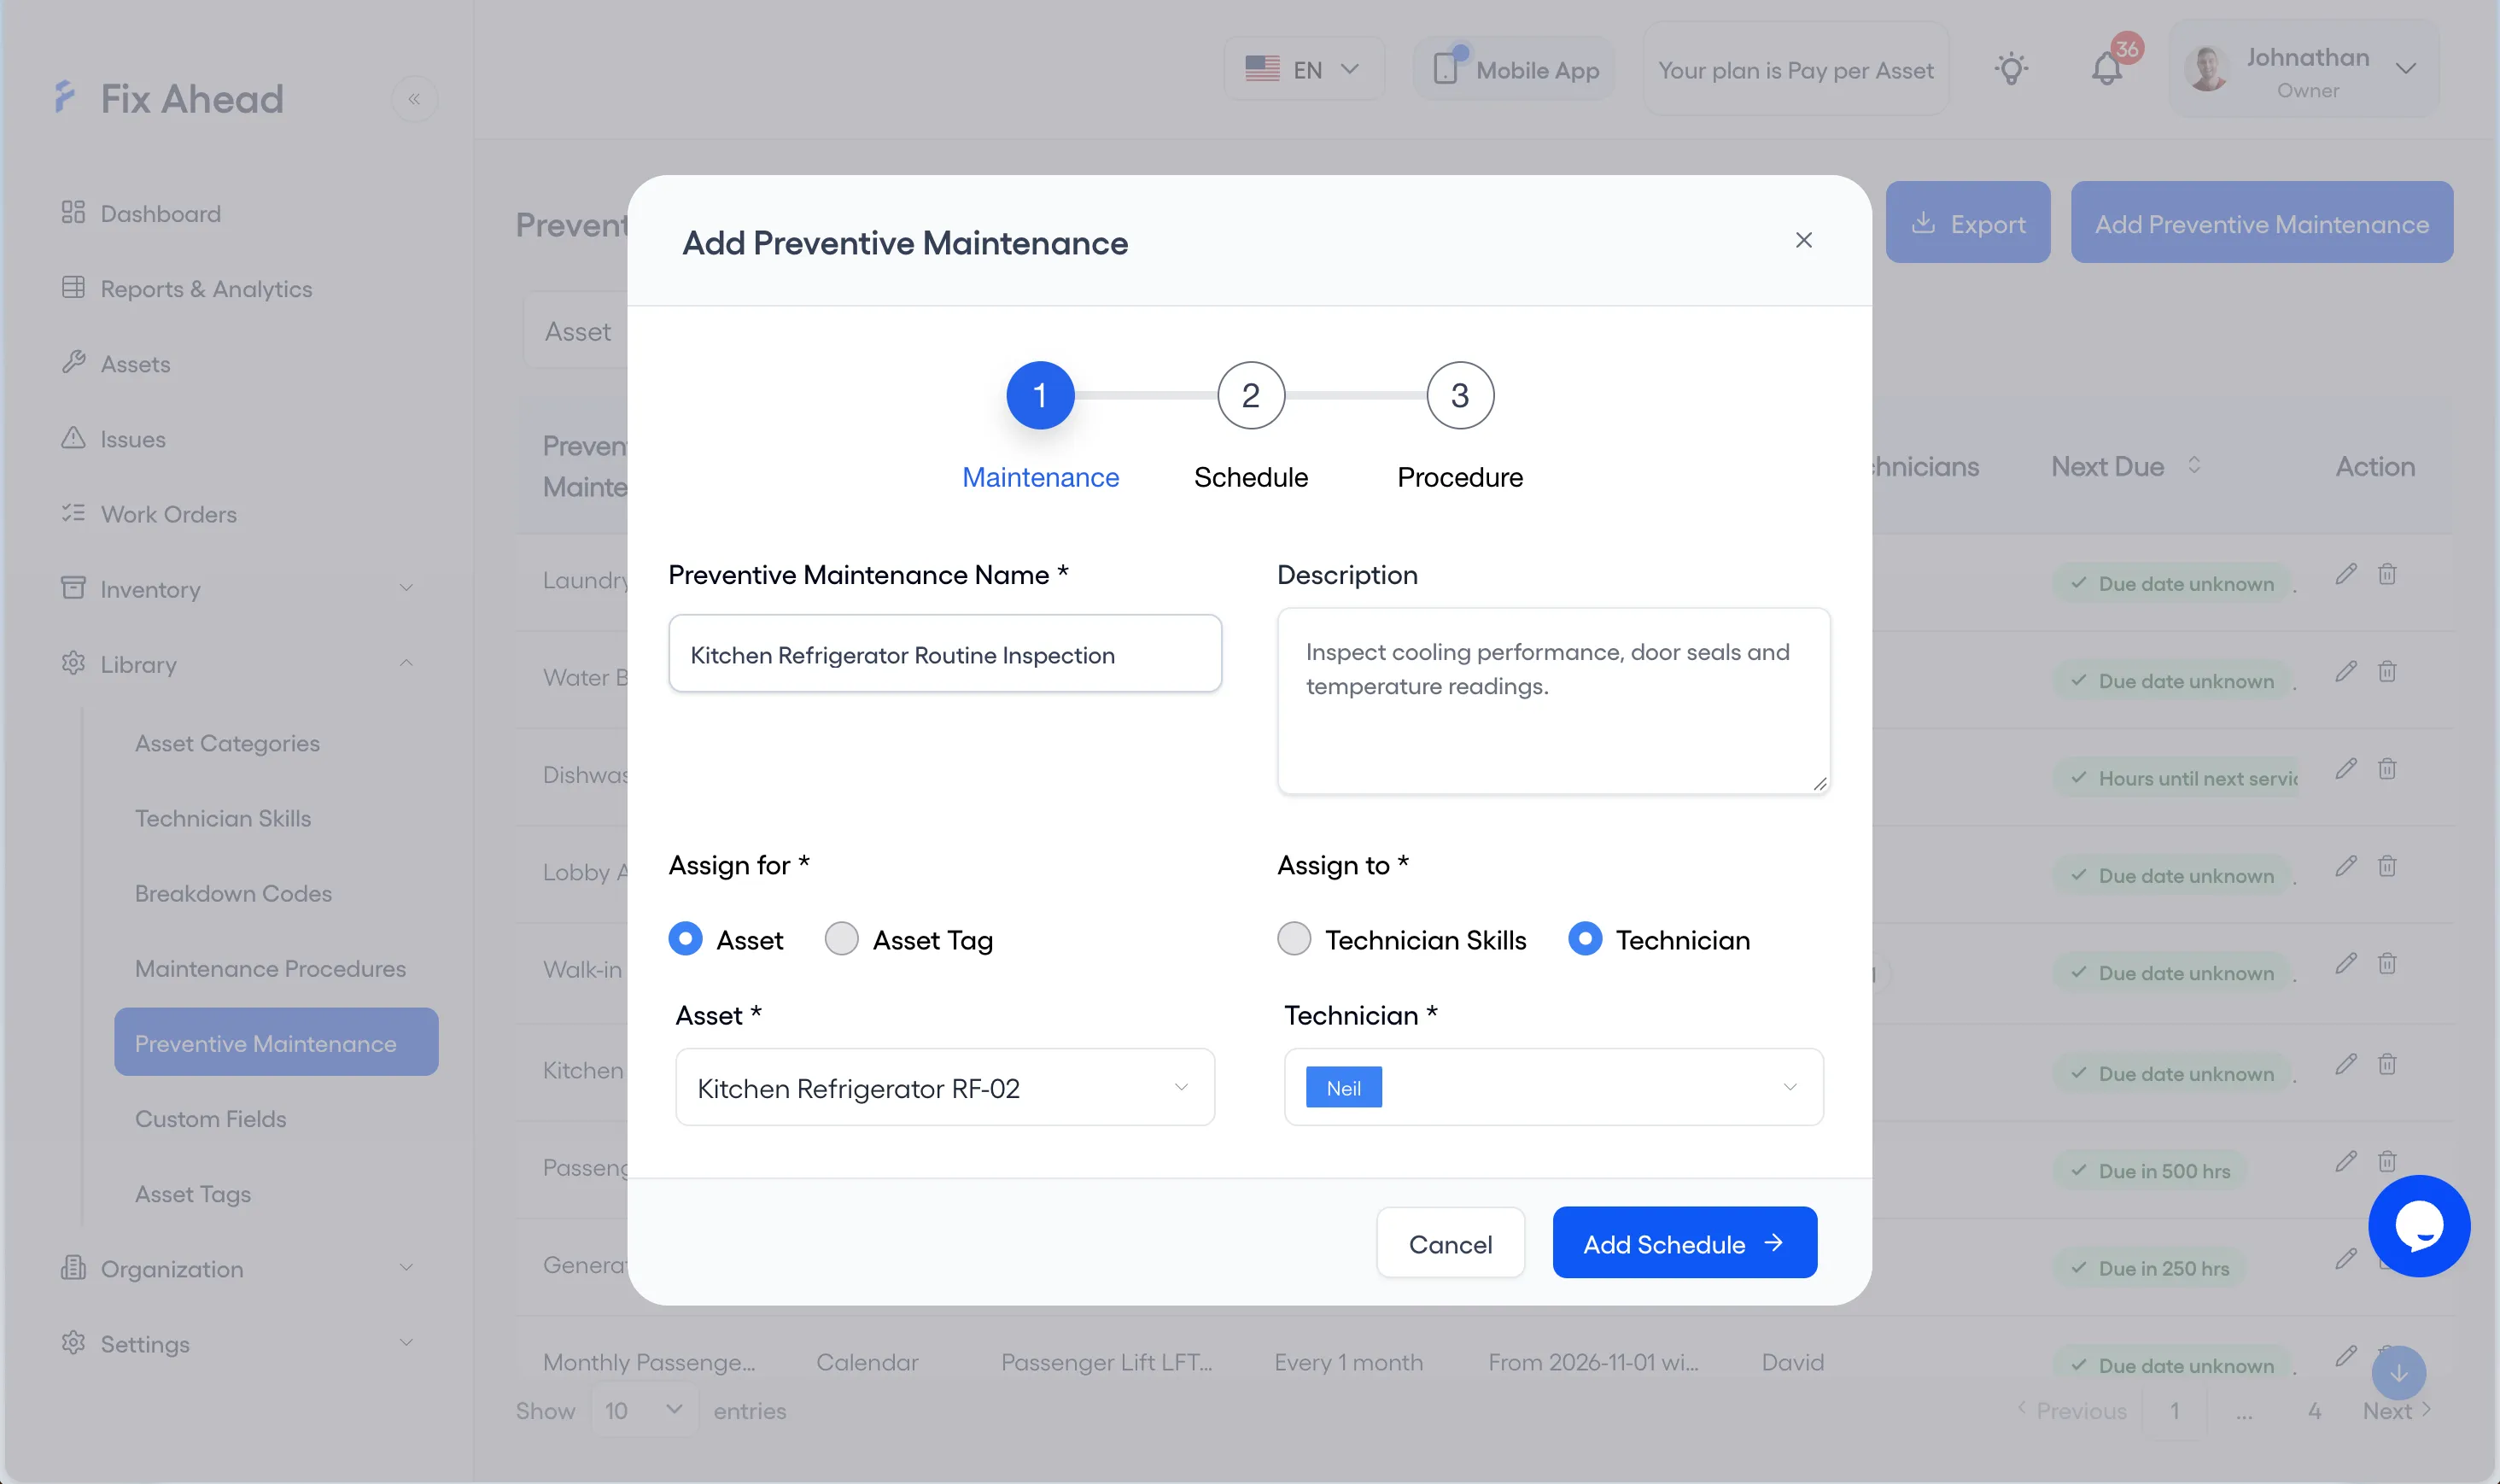
Under Library, open Preventive Maintenance and press Add Preventive Maintenance. Name the task, choose its asset and the technician it is assigned to, then press Add Schedule.
4. Set the calendar and the lead time
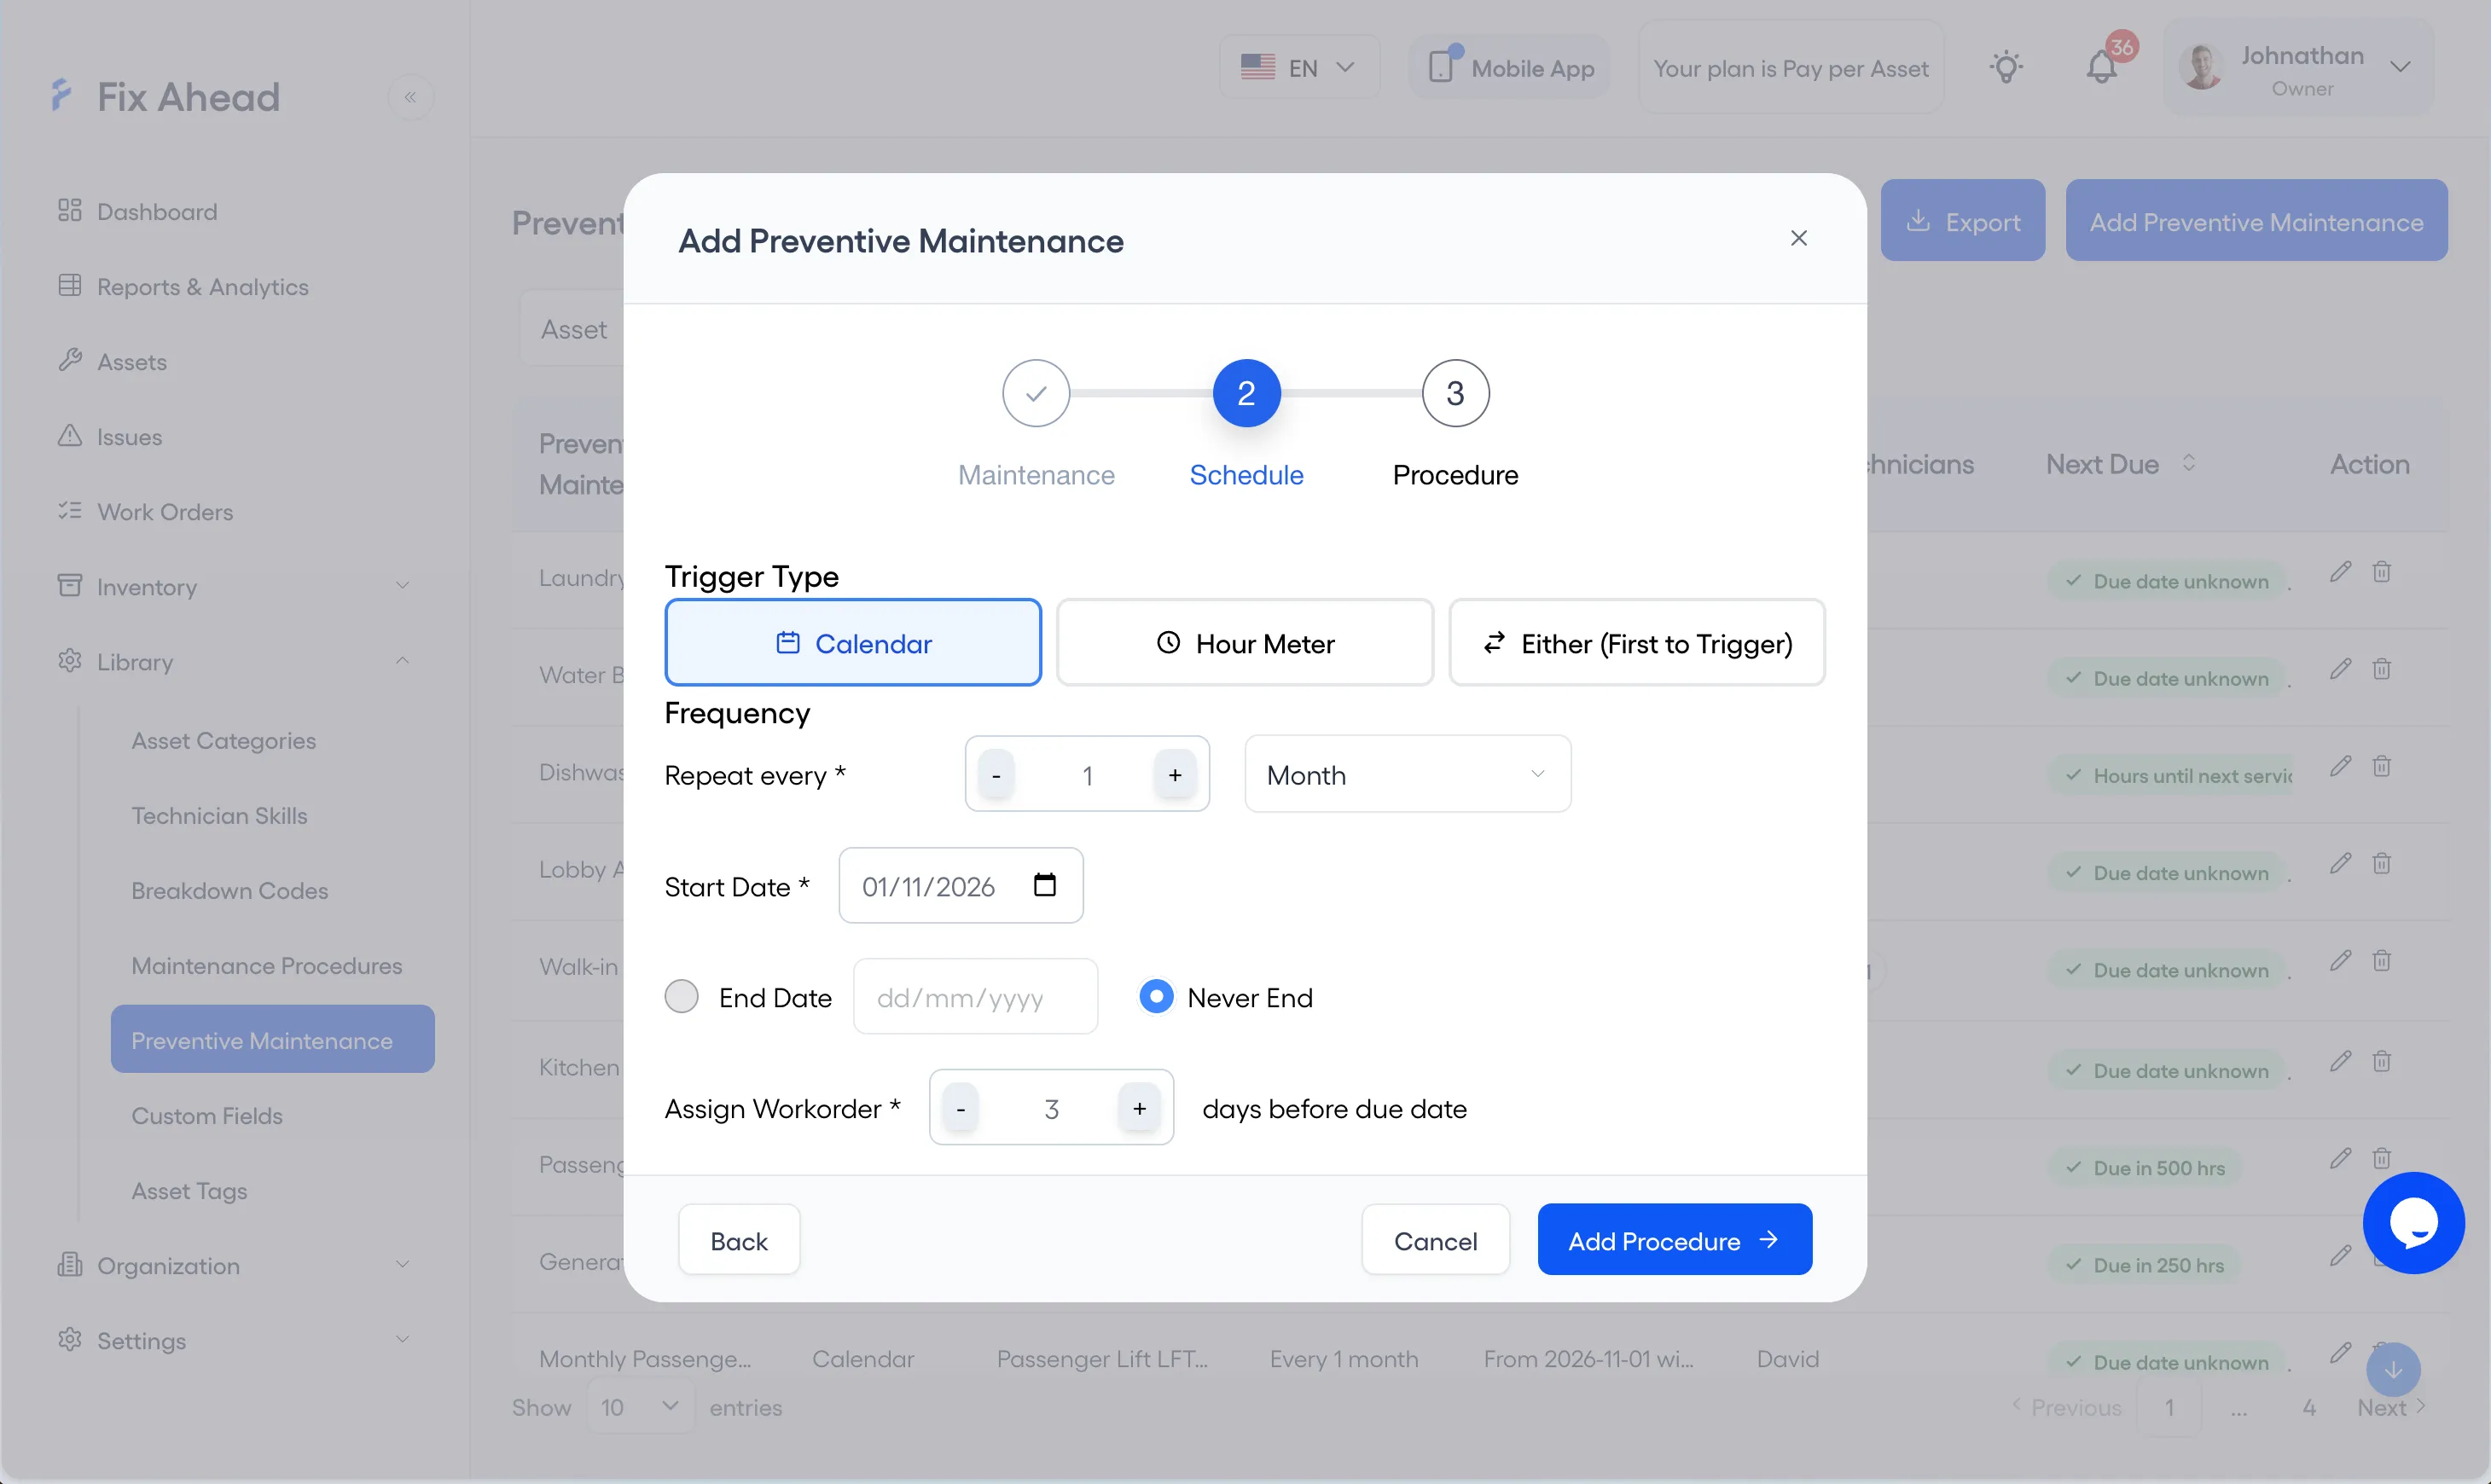
Choose Calendar as the Trigger Type, then set Repeat every, the Start Date, and End Date or Never End. Set Assign Workorder to the number of days before the due date that the work order is assigned, then press Add Procedure.
5. Choose the procedure
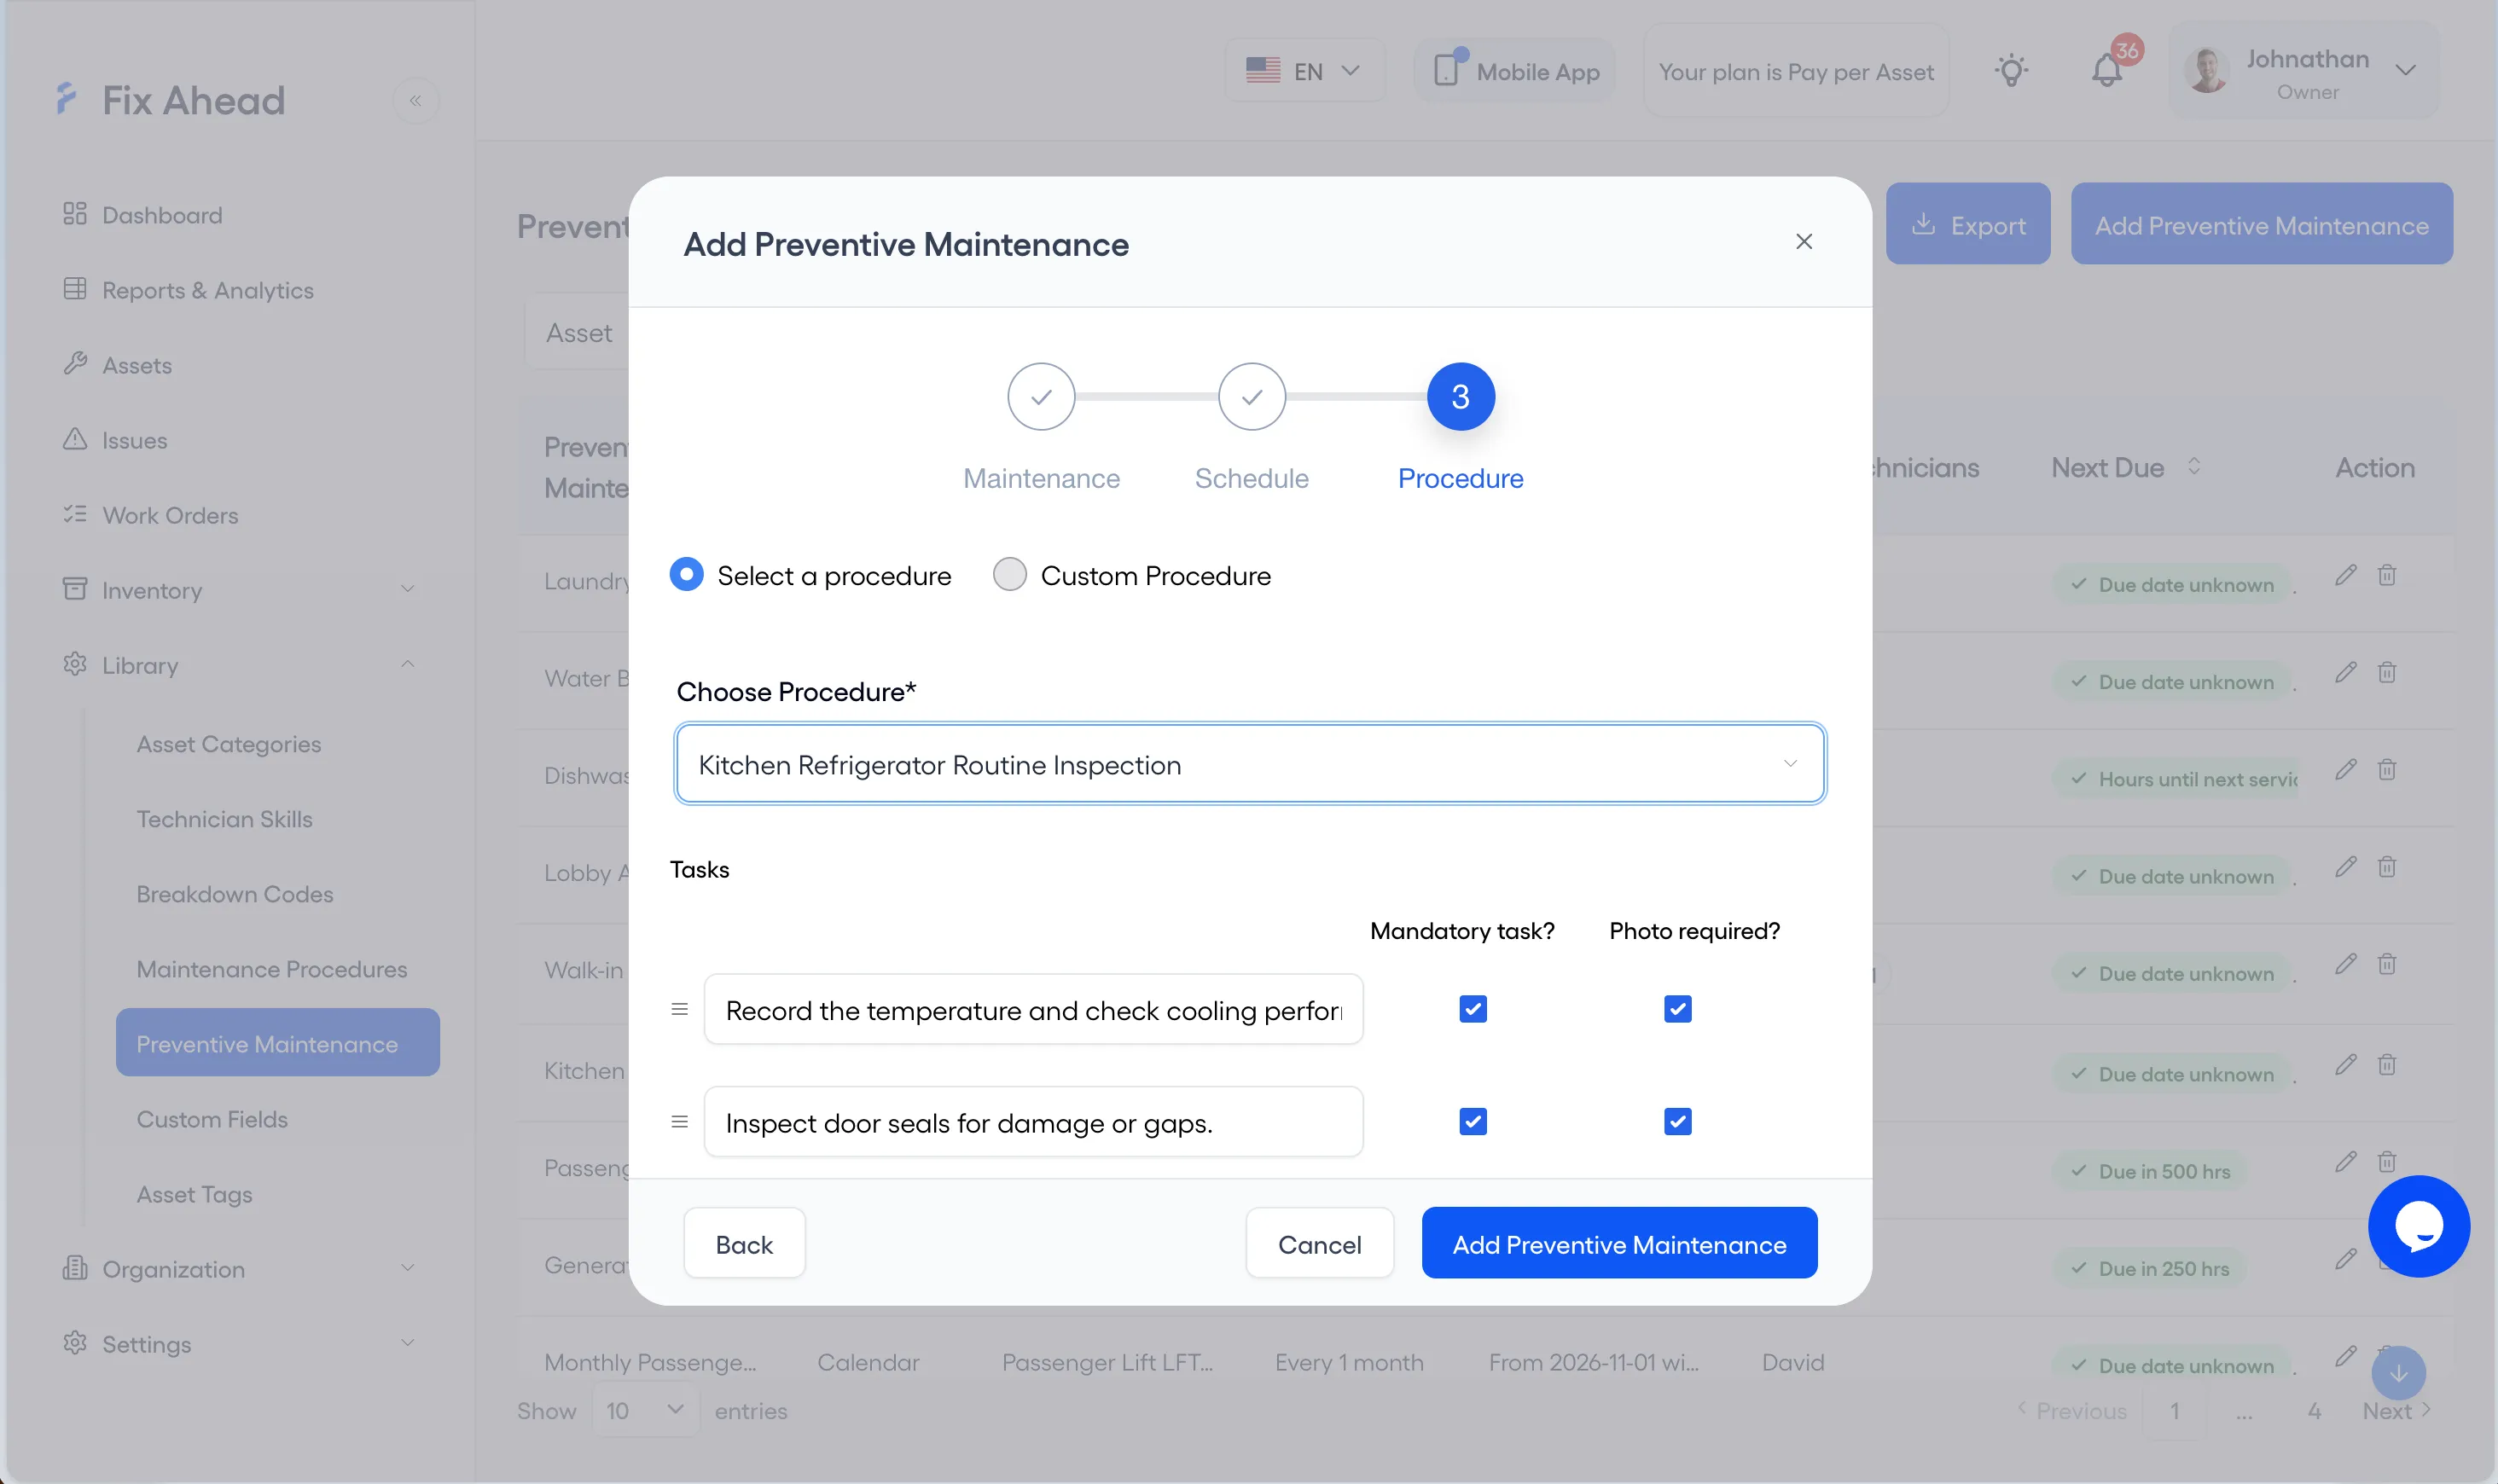
Choose Select a procedure, then pick the procedure you added under Choose Procedure. Press Add Preventive Maintenance to save the schedule.
6. Read PM compliance
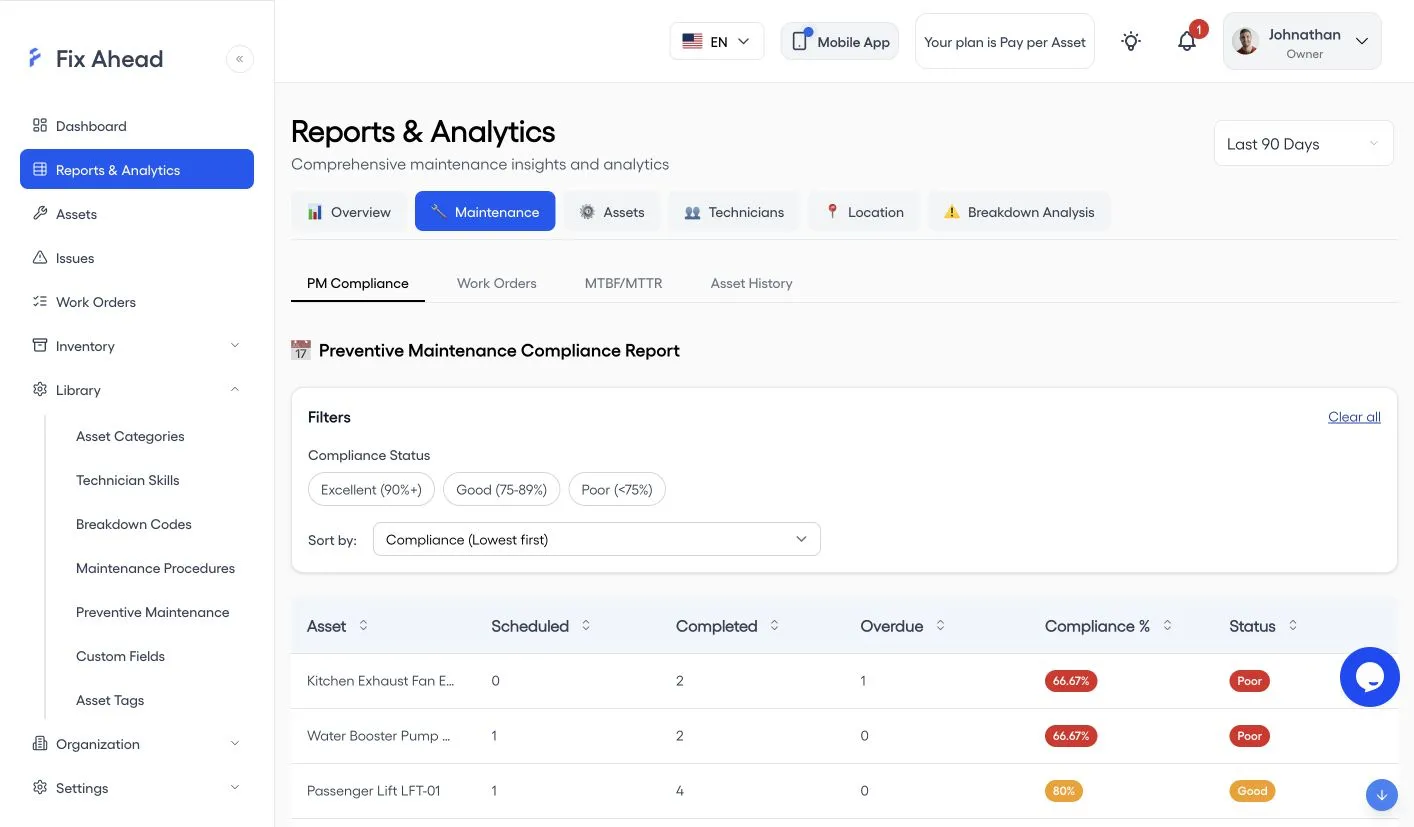
Open Reports & Analytics, choose the Maintenance tab, and open PM Compliance, then set the time range at the top right. In FixAhead, the PM Compliance report shows each asset’s compliance as a percentage: its Completed PM work orders out of its Scheduled, Completed, and Overdue ones, for work orders created in the period. A late completion counts as completed. Each asset shows its Scheduled, Completed, and Overdue work, its Compliance %, and its Status, and you can filter by Excellent, Good, or Poor.
Measuring the Impact
After implementing preventive maintenance, track these metrics:
- Unplanned downtime — Should decrease
- Mean Time Between Failures (MTBF) — Should increase as equipment is maintained properly
- Mean Time To Repair (MTTR) — Should decrease as problems are caught earlier
- Maintenance cost per asset — May increase initially, then decrease as reactive repairs drop
- PM compliance rate — Should stay high once the schedules are running
Measure planned work against unplanned work
Count your planned (preventive) work and your unplanned (reactive) work each month. Track the planned share over time, and aim for it to rise.
Getting Started Today
The biggest barrier to preventive maintenance isn’t technology — it’s the decision to start. Pick your 10 most critical assets, set up basic PM schedules, and track compliance for 90 days. The data will make the case for expanding the program.